Showing posts with label IKEA. Show all posts

Starfall Quilt

I'm pleased to introduce my very first published pattern, Starfall!
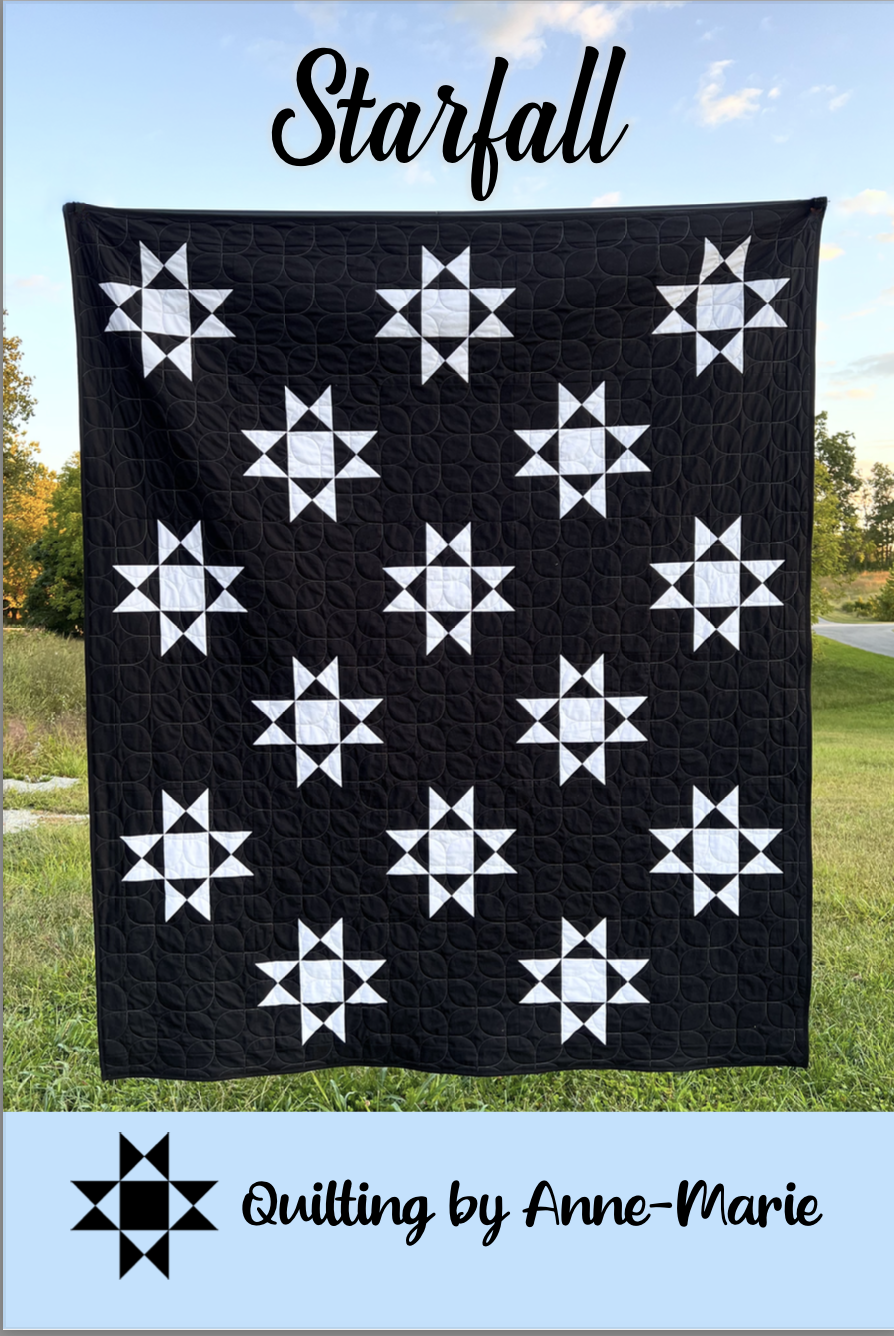
I designed, sewed, quilted, bound, and wrote and had the pattern printed all in one week. It wasn't perhaps my best idea, but I really wanted to have something to hand out at the retreat I attended a few weeks ago and I waited too long to have something like pens printed with my logo. This pattern is in the postcard pattern style, 4" x 6", with the photo on the front and the instructions on the back. It even has an official barcode!

Starfall is available as a PDF download in a larger format (instructions closer to 5" x 7" size) here at a very modest cost.

I made my sample quilt using Kona Black and Kona White to match my website and logo, but it would look fantastic in just about any fabric combination.

I used the Mid Mod Orange Peel design for the quilting. I was very excited to have the perfect piece of black and white fabric in my stash for the backing fabric. It's a print by Gingiber though I can't recall the name of the line.

In other news, I've completed five more blocks of my Log Cabin Stars quilt. This is the last week of the QAL and I have 10/42 blocks made. I'm going to another retreat Friday and Saturday, this time with my small guild, and am planning to make more of the blocks there. Who knows, maybe there will be a glitch in the universe and I'll actually get all the blocks made?! 😂

I also made and attached to the front the binding on the Buttercups quilt. 

I'm in the busy season for quilting. Here's this week's batch of quilts:

Trish's Girl Scout Chandelier quilt. She selected Pretty Paisley and light pink thread and it's so cute and girly!

Next is Trish's Bar Hop quilt. We decided on Riviera for the quilting and she wanted dark navy thread. You know I love blues! It looks very sophisticated.

Barbara's baby quilt, quilted with a new design for me, Mod Moon. This design was a little challenging, but I got there in the end.

I quilted Jess's quilt with Cloud Nine Petite and also did the binding. She's a newer quilter and it's so fun to see her skills improve with each quilt. This one was so square!

I spent a couple days on Annie's quilt. It's a king size and I can't share what the quilt looks like yet (waiting on the pattern release), but I can show you a bit of the quilting. Another new design for me, Cone Flowers. This design was a bit tricky to set up, but once I got it figured out (the offset had to be set at 75%; weird), it quilted beautifully. It just took forever! The gray fabric is on the front and the green is the back. The quilting is hard to see on the back. Sorry. I tried. It's all Alison Glass fabric.


Moving on to nature, I forgot to share this picture last week. Some quilts got delivered while I was gone, so I texted my son to bring in the box when he got home from school. Here's what he sent me, along with the comment that he had to remove it before bringing in the box. Gee, thanks! LOL.

We spent a little time over the weekend weeding the side garden. My husband was cleaning out the vegetable garden and we were really surprised to find out we had a few pepper plants grow and produce peppers! I had planted a few seeds from a generic bell pepper colorful mix. I didn't think any made it beyond tiny seedling stage. We got really tiny green bell peppers, like cherry tomato size, and some banana-pepper like yellow ones. 
The yellow pepper picture didn't turn out so well. Oops.

I started looking at the upper garden as well. I thought I'd start working on removing the lamb's ear, but I couldn't get most of it to come out. Husband to the rescue. He started removing some that was hanging over the sidewalk. There's a lot more to go, but at least now the sidewalk is more open than it was before. Plus we were tired from the other gardens. All our gardens got very out of control this summer.

Meanwhile, Peanut the silkie chicken is feeling broody. She tries to sit on all three girls' eggs and growls and pecks when my daughter reaches in to gather the eggs. Henry the white rooster is nice and healthy now and moves in and out of the coop almost with ease these days. 

Finally, the kids were both on fall break Friday and we ran up to IKEA so that someone could get a stuffed alien toy. We got there shortly after opening and I thought we'd be quick. Nope. We came home hours later with the alien, a stuffed shark, an office chair, and various  other items. I thought this display in the children's section was really cute.
The dog was dressed in a sleep sack. So darling!

Next Wednesday's post will be a combo of regular post and OMG finish link up because I'm lazy and don't want to write two separate things.

New Cutting Table Update

My new cutting table is wonderful.  Here are some newer photos of the assembly process.  To see the previous post, click here.

Here is a picture of the three cabinets assembled. Two are back-to-back, with one on the end.

Here is the painted piece of plywood.  Isn't this an exciting picture?  Ha ha.

My husband attached the painted piece of plywood to the bottom of the cabinets.  This helped hold everything in place and make it more sturdy.

Lots of screws!

Here is a picture of one of the casters.  It has six casters--one on each corner and one on the middle of each long side.

Here is the finished table.  You can see how we added some trim pieces around the table top we purchased in order to make it extend to the edges of the cabinets.  All the baskets pictured are from Ikea.  The rattan one is a Branas basket.  The aqua ones are Drona.  The table is a great height for cutting, about 36".  And boy, can those cubbies really hold a lot!

We have the top attached with wide sticky back Velcro strips right now because we couldn't easily fit the whole thing through the door if it was one piece.  Plus we aren't sure that this top will be the final top.  Surprisingly, the Velcro is holding really tight.  It works great!


The End of the Cutting Table & The New Parts

If you are a Facebook fan of mine, you know that I recently blew apart my cutting table. This table is one that JoAnn Fabric sells.  We bought mine around 16 years ago.  Back then it cost around $50.  It is a great height for cutting, and it folds and has wheels.  In theory it is great.  In reality, it is wobbly and crooked and not very stable.  It probably doesn't help that it has moved (addresses, not locations in the house) at least 13 times, tipped over a few times, and been heavily used.

We currently have the table in the office.  Every time I need to get into the closet, I have to move the table back and forth to make room.  A few weeks ago, the table decided it had been moved enough.  As I grasped the table leg to move it back into place, the whole thing came right off in my hand.  Luckily my husband happened to be sitting there and quickly moved to hold up that side of the table so that I could move all my things onto the ground so they didn't fall.  What I didn't realize at the time was that he was trying to tell me to clean off the ENTIRE table, not just that side.  Yep, the whole thing was blowing apart. The sad thing is that about a week prior to this, I was telling him that I was going to need a new table soon because the surfaces weren't lining up flat anymore.  Joke's on me, huh?

Here's the table and pieces.  It's bound for the
recycling center this week.  The table usually
has a silver ironing cover on it, but I rescued that
and will attempt to reuse it.

Anyway, after some quick moving and dissolving into a laughing fit, I asked him what we should do.  Obviously I have to have a cutting table.  We looked online at the new JoAnn version.  It's gone up quite a bit in cost since we last bought one and it doesn't look like the quality has gone up with the price.  We decided to take a trip to IKEA to get parts.  Here's what we have so far:
Three white Expedit shelves from Ikea, $40 ea.

59 x 30 birch table top from scratch and dent section, $12.


The table top we purchased was not quite large enough to go over the Expedit shelves, so my husband also made some trim pieces (free from father-in-law's scraps) to go around the top.  I was intending to just use the top and the trim pieces, but he says we need a piece of Formica to go over it all. He has also purchased and painted a piece of plywood for it all to sit on (around $40), and it will have six casters underneath it ($36).  Not quite as reasonably priced as I was hoping, but hopefully this one will last a lifetime.  My job is to pre-assemble the shelves.  I am so far failing miserably.  I don't have the hand strength to use the little tool that comes with them and actually get it tight enough.  Stay tuned for more details.