Showing posts with label pin cushion. Show all posts

Flower Patch SAL Blocks 6 & 7

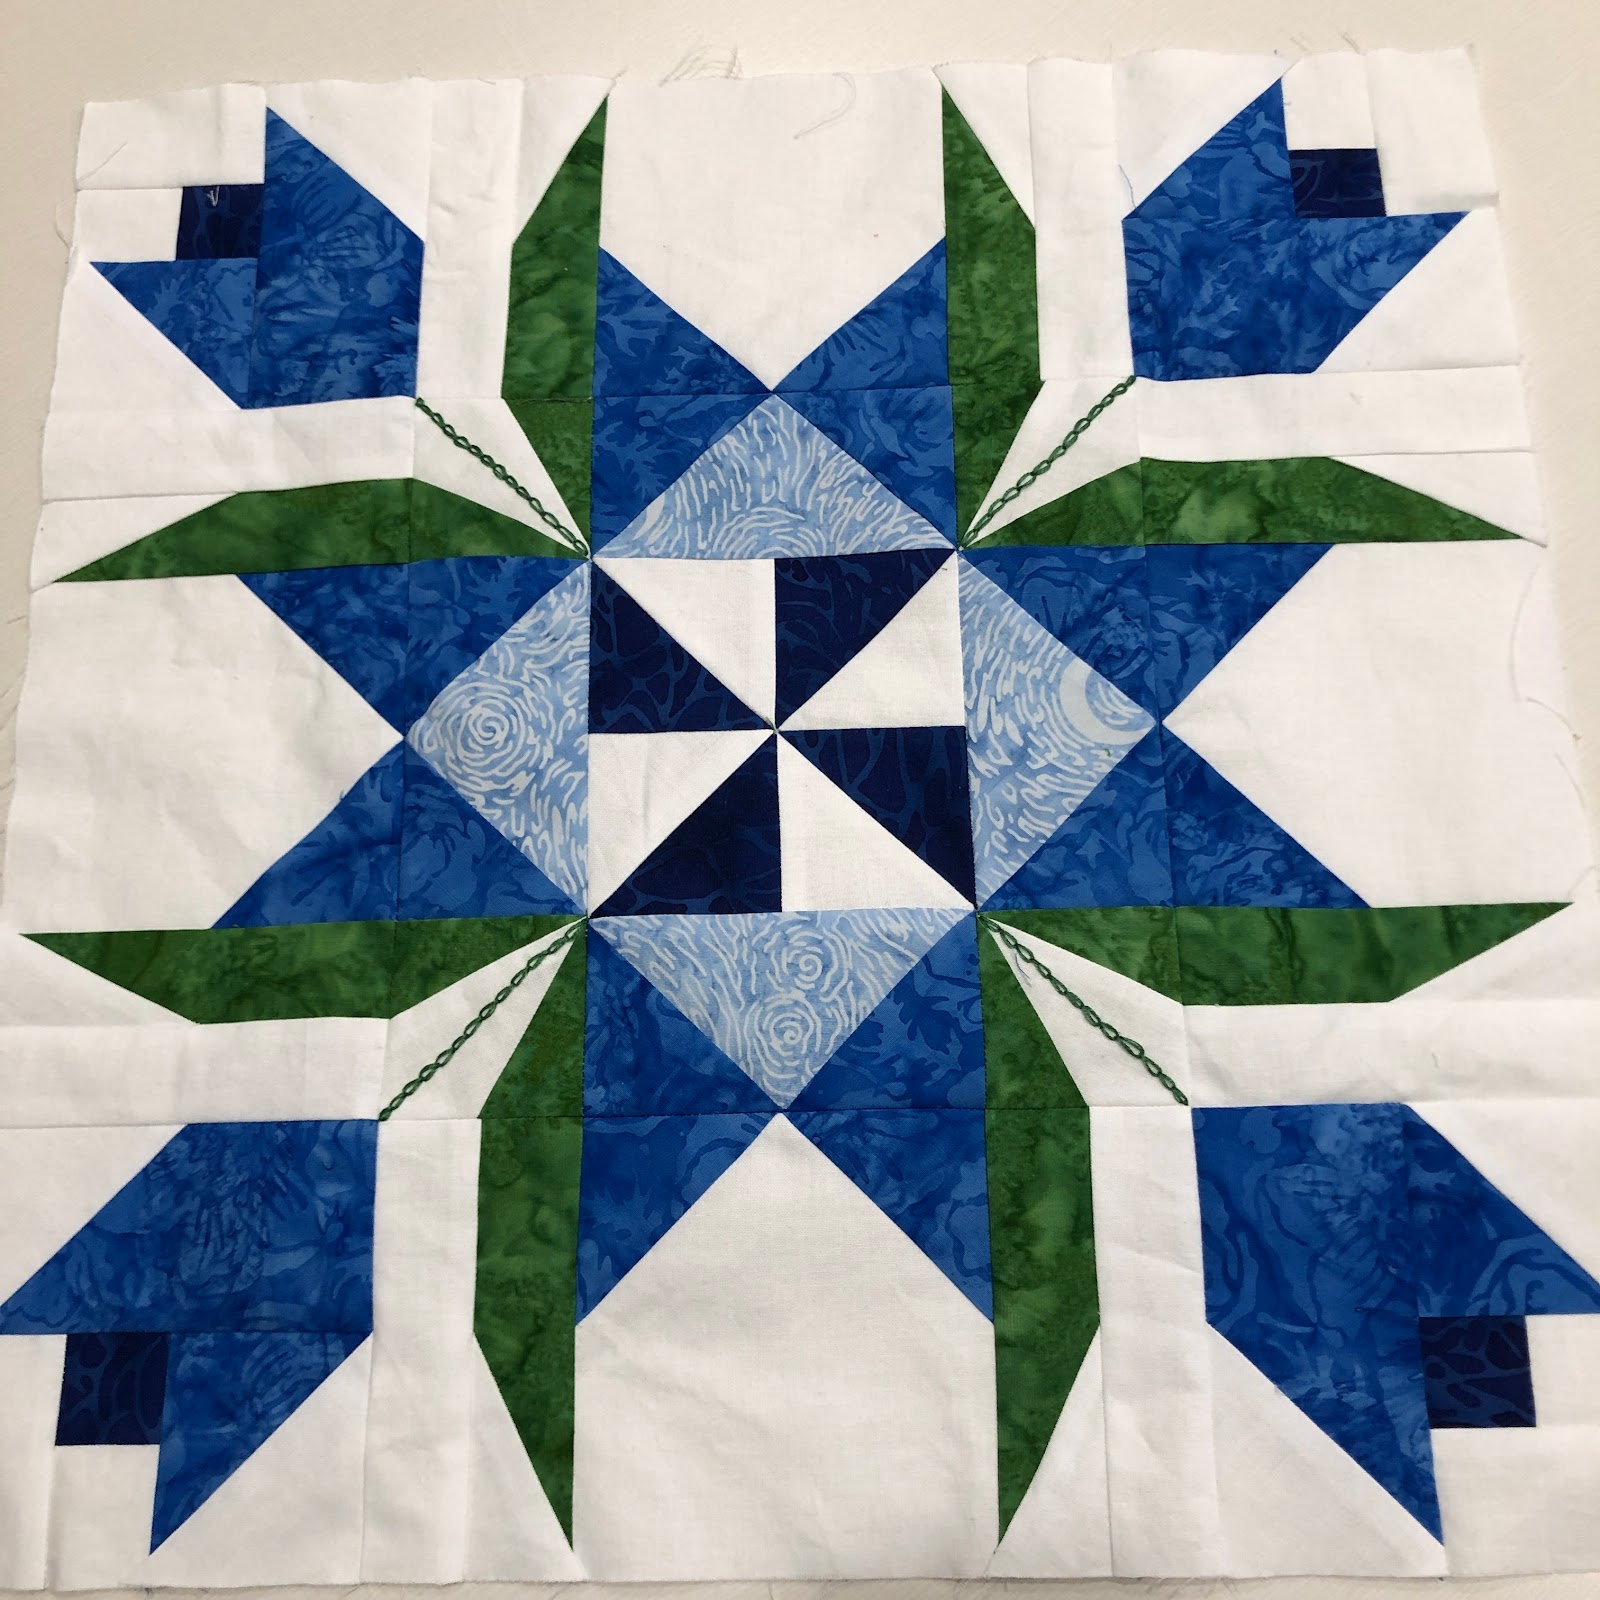
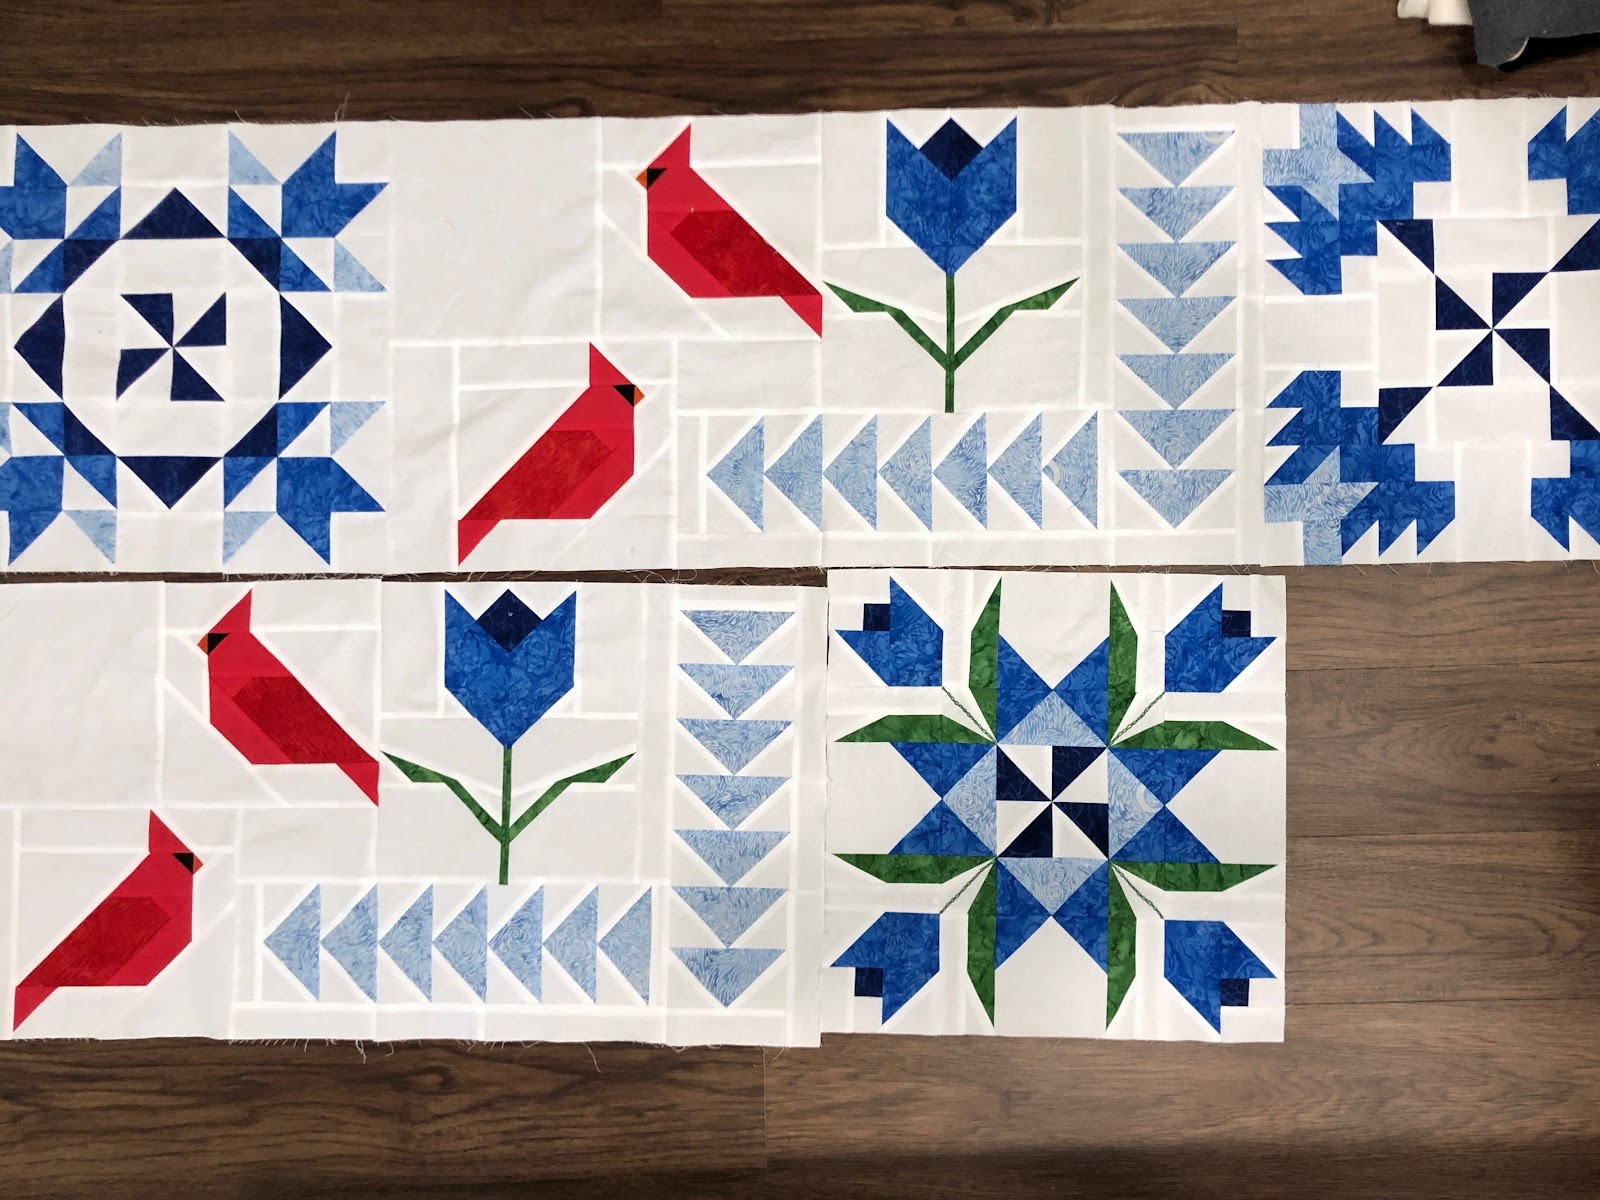
Today's the day to link up blocks 6 & 7 in the For the Love of Geese Flower Patch SAL. I had gotten a bit behind on these, but I'm totally up to date now! Well, I still need to work on block 8, but that released today. :)


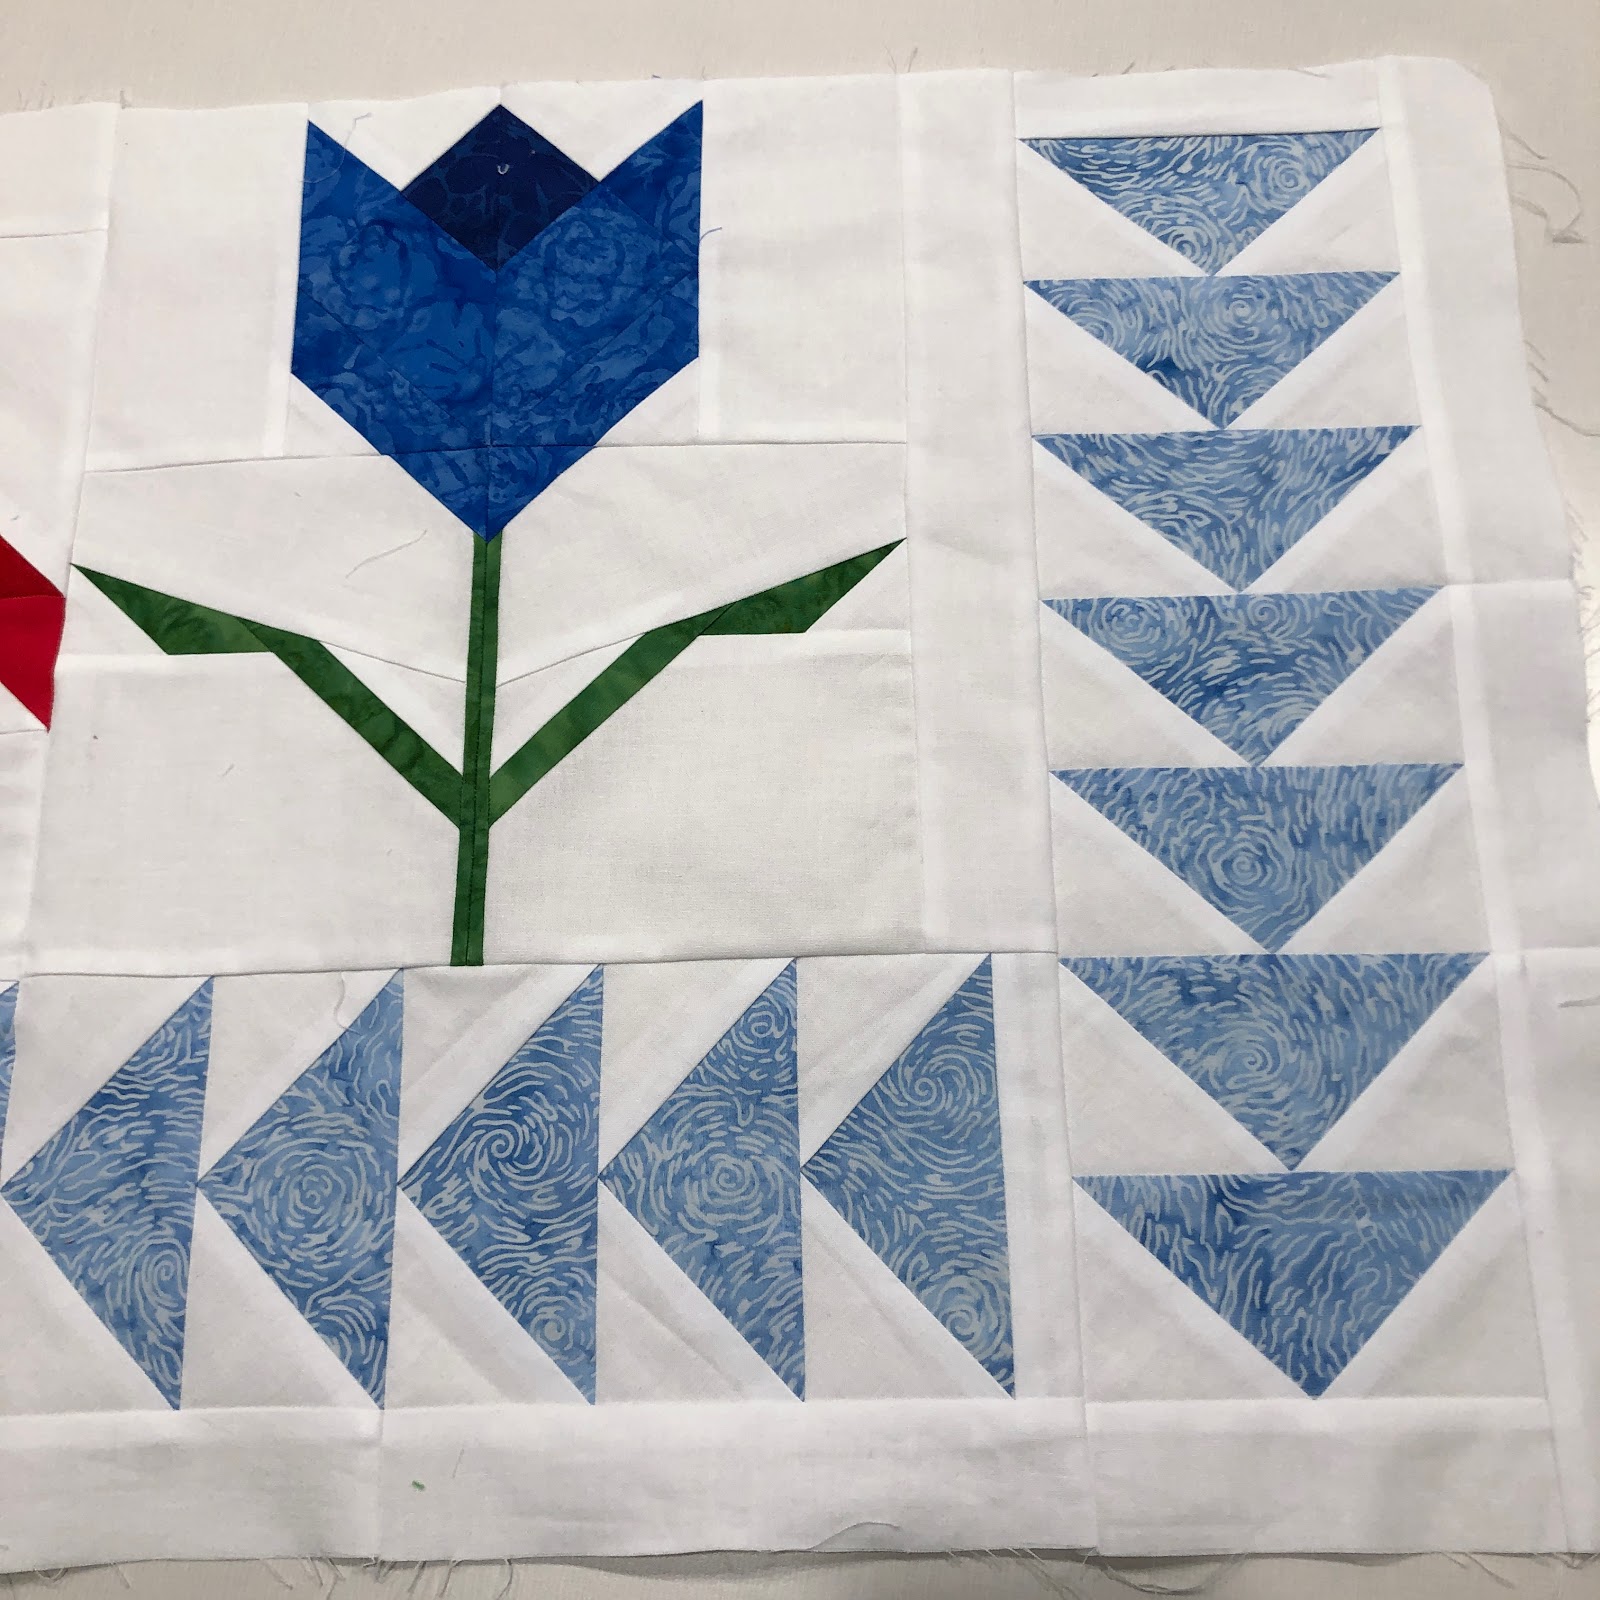
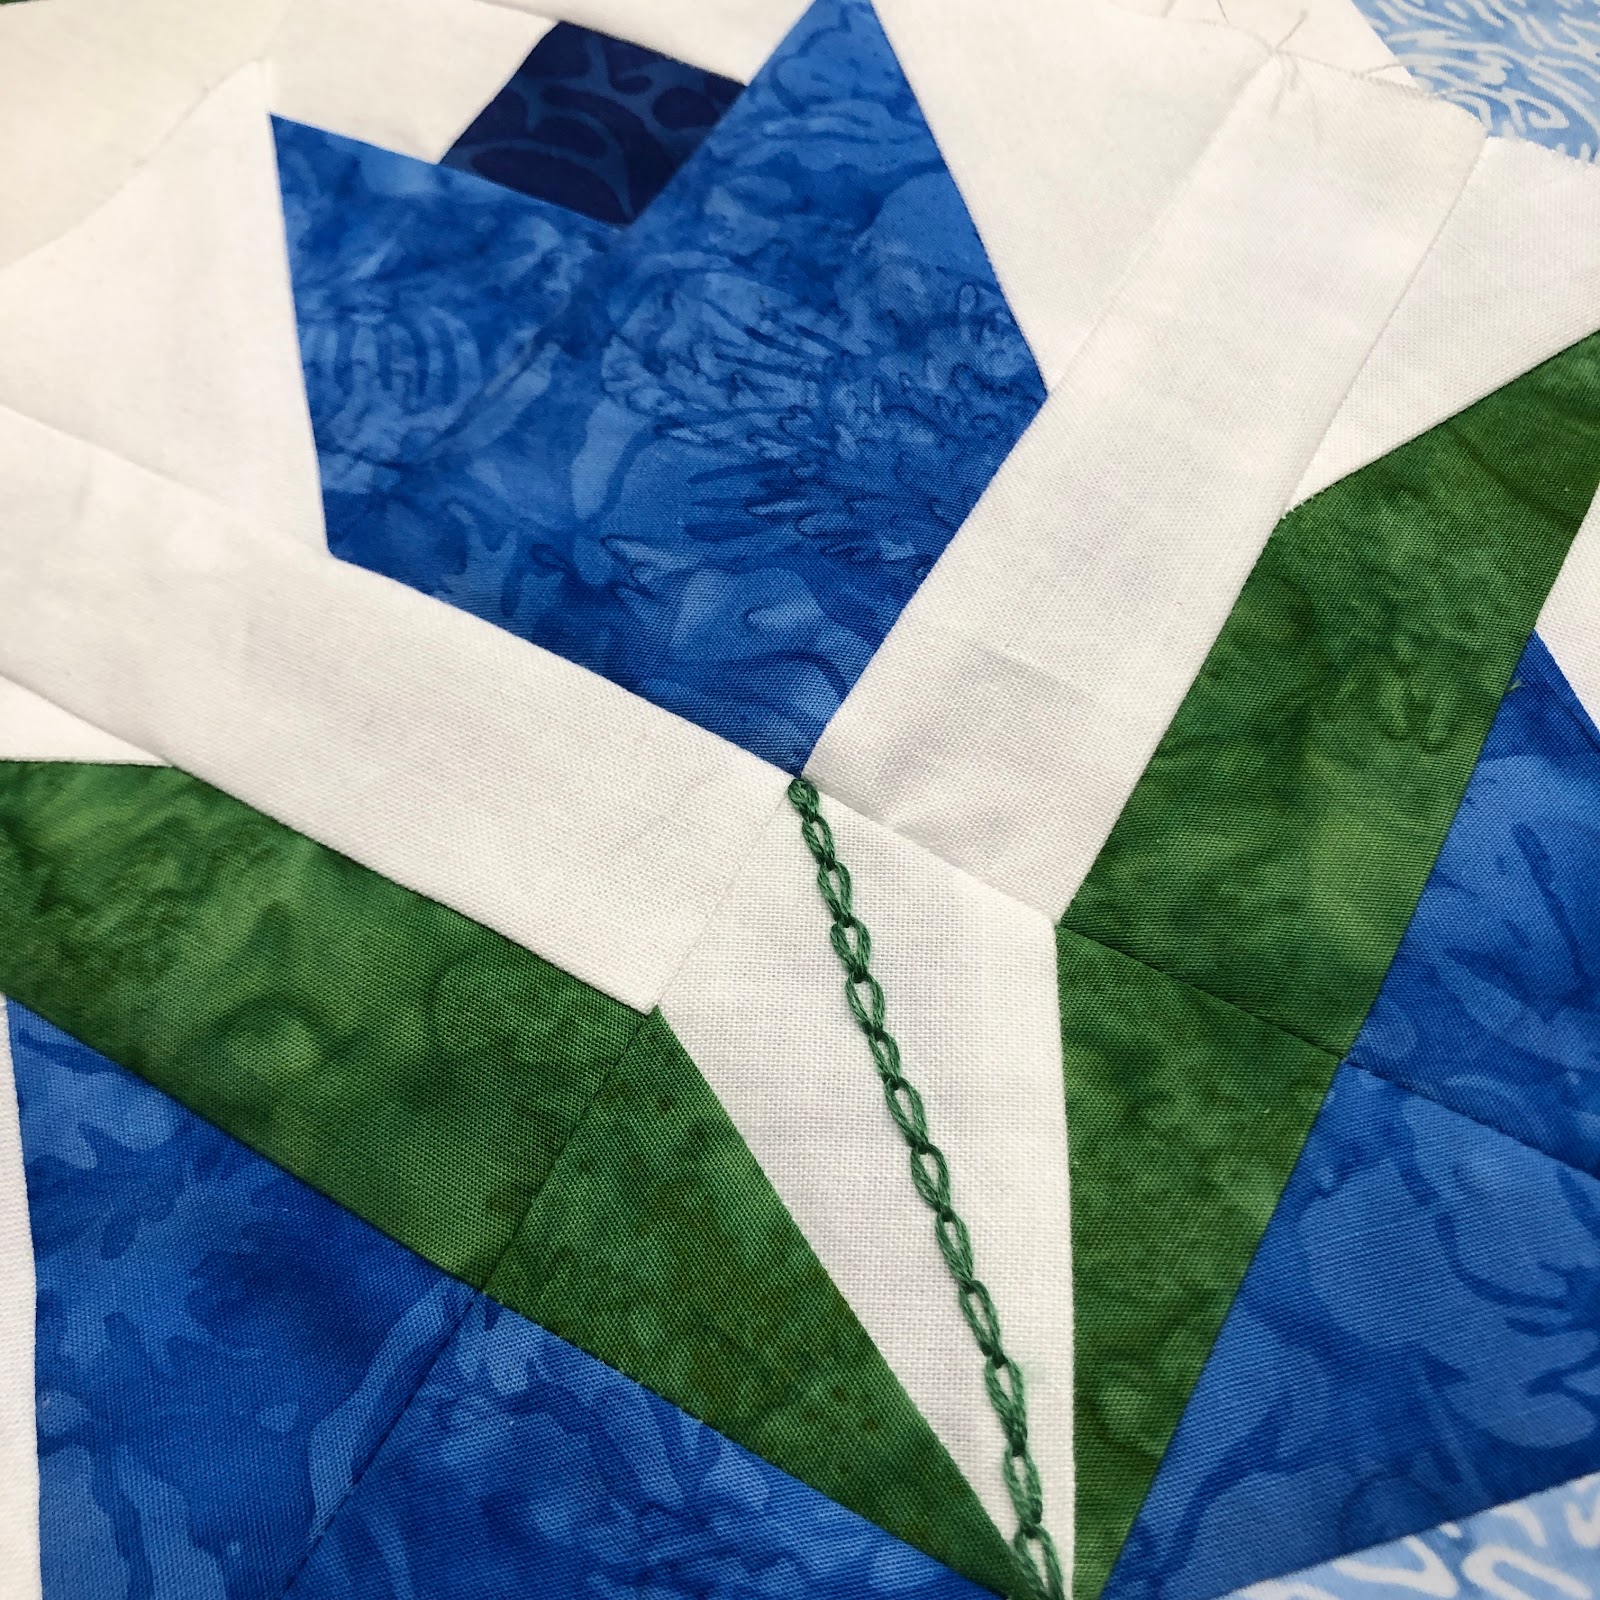
I chose the embroidery option on block 7. I stitched a chain stitch for each stem. It's a bit wobbly, but I think the overall look is okay. If you stand back, you can't see how uneven my stitching is. It is soooo much easier to embroider on Aida fabric!

Here are all my blocks together. They're a bit cropped; couldn't fit everything in the picture.
I've also managed to get up to date on the Macaron Mystery
And I've been squeezing out bits of time over the past few weeks to make some gifts for a quilting friend. I made this little pincushion using the pattern in this month's American Patchwork & Quilting.
I made a covered button and my husband glued it onto this giant paperclip blank for me.
I made several design boards in two sizes and my husband made the coasters.

I was going to quilt one of my oldest WIPs, circa 1999. I needed to make the backing. Back when I started this project, hand quilting was still the thing. I do not enjoy hand quilting, which is partly why this never got done. Luckily there was still enough backing fabric to load the quilt on the frame. You can see the quilt top in the background.

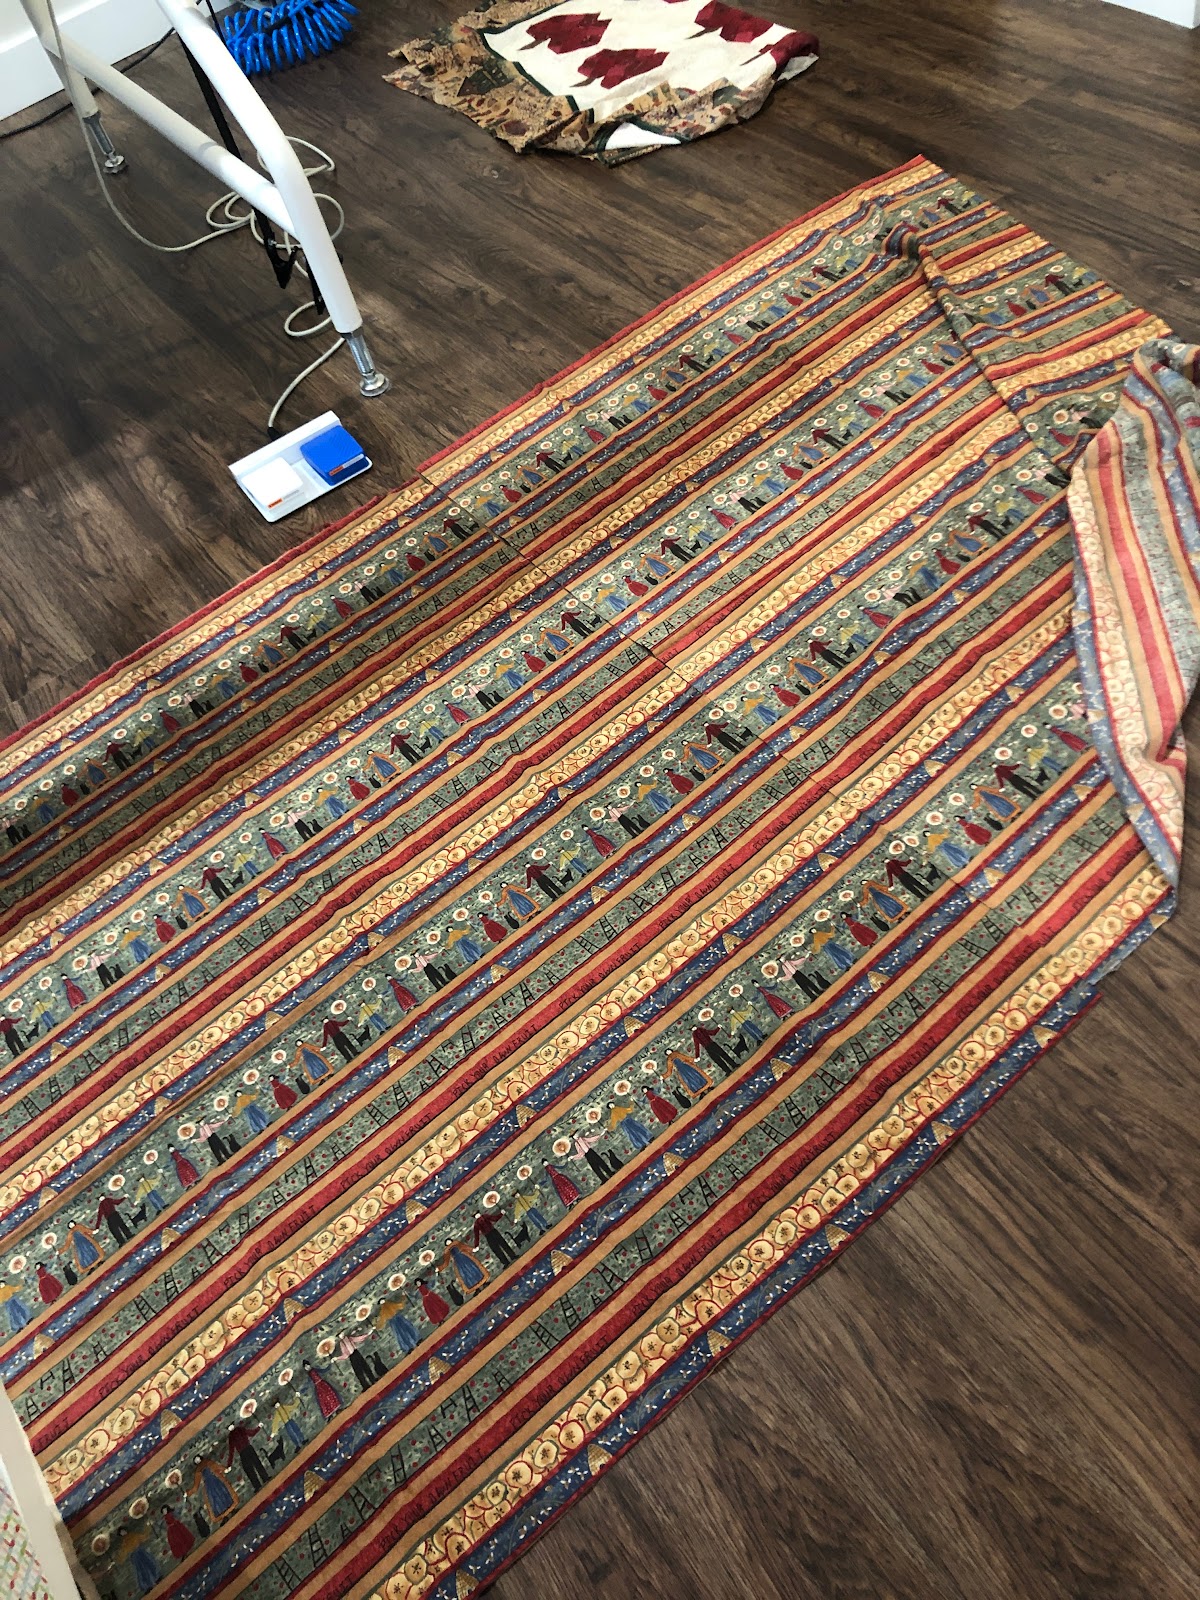
I attempted the pattern matching using glue method as outlined at Suzy Quilts. I didn't have a washable school glue stick, so I used the Sew Line glue pen. It mostly held, but it wasn't great.

I had everything loaded and was starting the pattern my husband had selected for this (for his mom, who used to have wallpaper that matched the fabric, though in a more attractive yellow, back then). My long arm was in a crabby mood and things didn't go well. The quilt is now off the frame for unquilting. 😐

So I did a deep clean and some testing on the long arm and of course everything now works. 🙄

I moved along to the next project, which is a bunny pillow. My daughter selected all the fabrics from my stash (yes! using the stash! awesome!). The paper piecing block for this can be found in EQ8, but I used directions from Threadbare Quilting (Bonita Bunny).

We went with Squatty Squared for the quilting. Fun tidbit: the backing fabric was originally supposed to be a bunny skirt for my daughter many moons ago. I recently used it in a donation quilt and used most of the remaining yardage for the pillow back.


My other accomplishment for the week is getting the test quilt ready for piecing. Everything is cut and laid out and I now need to make time to sew, which will be challenging over the next week. No photos until the pattern releases though.

The only things remaining on my December list that I haven't gotten to yet are assembling the Grassy Creek top, keeping up with the Rhododendron Trail mystery, and making myself a shirt.

I mentioned before that we ordered furniture for the basement, but won't receive it until sometime next year. In the meantime, we have an FTC robot field set up. They use the giant tv (my husband's gift to himself) to display their programming while they work. I guess it's been successful--they had their first league play tournament Monday and the boys placed first! I think they were all surprised.

Have a wonderful week. Happy Christmas to you if you celebrate.


What I'm Up To

Last weekend I spent a day sewing with some of my quilting friends.  I didn't want to arrive empty handed, so I made pincushions for each of them using some of my scraps.  I was inspired by Amanda Jean at Crazy Mom Quilts.  I adore her blog.  Go check it out!  The top center pincushion below was made using one of her tutorials.  I was inspired by some of her other pincushion pictures to make a few of the others.  I used some previously made HST on a few and tried improv piecing (or as close as I ever care to get) on another.

Hopefully you can tell this is supposed to be a spool of Aurifil.  I should have quilted diagonal lines on it to make it look more realistic though.
This one is all made from Lori Holt fabric.  The HST finished at 1/2".  I may be crazy.  Ha ha!  It didn't seem so bad when they were 1" squares before sewing.  These HST were all trimmings from previous blocks.  Any time I trim off triangles, I sew the extra seam in to make new HST.  I'm happy to have used some of them.
Last week I mentioned I'd pulled out a project from 2005 (designed by Kimberly Einmo).    I think every block was a different size!  Since my piecing wasn't the best, I decided not to worry overmuch if things didn't line up just so, and just went for it.  So now the bulk of the top is assembled.  I have the first row of the borders assembled and partially sewn on.  Then there are three more borders after that.  

I also have been spending a lot of time this week trimming the blocks I sewed over the weekend.  I'm quite thankful for the rotating cutting mat and the Bloc-Loc ruler on these!  It felt like the never ending cutting job.  In reality there are around 240 of them.  Next up on this project is deciding on a layout.
I'm more than halfway done with the binding on the S'mores quilt, so I decided I needed a new handwork project.  I'm planning to work on this cross stitch kit.  I think I previously put in about 30 stitches before setting it aside a good number of years ago.

I'd also mentioned that we bought a bunch of magnets from Harbor Freight to assist me in putting quilts onto the longarm frame.  We purchased three of the magnetic tool holders (free this week with coupons!  Boo, missed that one!  Those things are like $12 a piece) and also some rectangular magnets.  We found a 3D printed magnet holder pattern on Thingiverse, and I wanted pink, so we ordered some filament from Monoprice.  It finally came last Friday and it took a good day to print four handles.  Here they are, mostly ready, but probably needing another coat of clear over the magnets since they were giving off black smears and I don't want that on my fabric.  By the way, these puppies are STRONG!!!  I was trying to set them near each other and they snapped together like this.  So if you choose to go this route, please exercise caution!


Oh, and I signed up for round 4 of the BC Barn Quilt Swap and should receive my partner assignment soon.  This is my favorite swap, and the only one I seem to sign up for at all anymore, with the exception of my guild swap.  I'd be open to a private swap of mini minis as well.  Follow my Instagram feed (over at the right---->) to see my progress on the barn quilt swap.  

Enjoy your long weekend!  Our school summer starts this weekend and right now it's looking like it will be a whirlwind of activities, appointments, and, unfortunately, jury duty for me. :(

#tbmqs2 and #handmadebirthdaygirls2016 Swap Updates

I sent out my Thimbleblossoms mini quilt swap this week.  After a long struggle with what fabrics to use that would suit my partner's tastes, I ended up using some Cotton + Steel basics and a Jeni Baker stripe.  I loved how the quilt came out, but was a little worried still.  Luckily, the recipient commented that she liked the colors.  Whew!  Here's some photos of the quilt and extras I sent:


It's really hard to get a nice photo of this quilt for some reason; this one has
the truest color representation.

I also received my quilt for this swap.  I'm guessing my partner is very new to quilting. I love the needle minder she sent (it's the little aqua flower to the left below).  I'm planning to use it as a regular magnet.  I also like the little hexagon label on the back.


I sent out my next birthday club gift to Jennifer in Germany.  Here's loads of photos of what I sent.  I had a lot of fun putting this one together.
Here's everything--1/2 yard of moon phases fabric, a mini Olfa cutting mat, hexi sticky notes, 1/2" hexagon paper pieces, some post its and page flags for a planner, a tape measure, two cross stitches, a Baymax USB, two Tsum Tsum washi tapes, two Frixion pens, and a rainbow of cross stitch floss.
Luna Lovegood cross stitch.  I framed it myself!
Some Felix Felicis
Baymax in a hoop


Text Me Mini Quilt Swap

Now that my partner has received her quilt and I have also received a quilt, I can show you pictures.  I really struggled with what to make for this swap.  I finally decided to use a pattern by Elizabeth Dackson of Don't Call Me Betsy that was published in Love Patchwork and Quilting.  This pattern used a combination of regular piecing and paper piecing.  I made the center first.  The coral plus fabric is by Cotton + Steel and the text fabric is Alison Glass Sunprint.  I used my Triangulations software to make the half-square triangles.  Then I decided to use a combination of Tula Pink Elizabeth and some various text fabrics for the plusses and crosses.  Well, it just didn't work out.  So I ordered some more text fabric and some more Cotton + Steel fabric and started over.  What you see is the end result.  I learned a lot with this quilt (and got a lot of paper piecing practice!).  I also practiced free motion quilting.  The design I used for that was based on a pattern I found on Lori Kennedy's website.  I really loved the end result and my partner seems to like the quilt too.  It was hard to send it away.
Fun fact--my partner lives in Nevada and I am from Michigan, so I used those words from my fabric to make some of the plus blocks.  :)
I used one of my "reject" blocks to make a pincushion and it turned out awesome, if I say so myself.  I also made a needle minder using a scrap of Elizabeth.  I recruited my husband to make some wooden irons and sent one of those as well.  On the right in the picture above are the remainder of the extras I sent--a piece of fabric, a note pad, and some mini pens. 
I had to learn how to make a quilt label on the computer and used printable inkjet fabric to make the label.  I then mounted it to another piece of the backing fabric--Joel Dewbury fabric, by the way.  Then I ladder stitched it down.  I also made little hanging tabs for the back. 


Below is a picture of what I received.  I was very surprised that this quilt was for me.  My daughter took the drawstring bag and has been using it to tote her library books.

#sqpinnieswap and Thoughts on Swaps

I have been participating in swaps on Instagram this summer.  The #sqpinnieswap is the first one that I have sent and received my item.  This was a blind swap, so the person I was making for isn't who I would receive from.  And it was kept secret who your partners were.  I received my pin cushion from the host of the swap, Carmen at Seaschell Quilts.
Everything was packaged inside the drawstring bag.
Here is my pincushion, a needle minder, a mustache pin, and a tiny seashell quilts pin.
There was also a package of rainbow Wonder Clips and a lip balm (which my daughter stole!).
My partner indicated that she really liked Heather Ross's Far, Far Away fabric line and that she liked gummies.  From looking at her IG feed, I determined that she also likes Disney princesses and cross stitch.  I also found her Pinterest and tried to get a sense of her style.  I agonized over what to make her forever.  It's pretty daunting to make something for someone you don't know.  You're pouring time and money into something and hoping they like it in the end.  

In the end, I made her a wonky log cabin pincushion.  It is about 5" square because I really wanted to use an entire unicorn from one of the prints for the backing.  I lined the backing with Pellon SF101 Shape-Flex and the front with cotton batting.  I got both these ideas from Amanda at Crazy Mom Quilts.  I stuffed the pincushion with a mixture of fiberfill and crushed walnut shells and closed it with a ladder stitch. Seems hard to believe, but I didn't learn ladder stitch until last year when my daughter was taking home ec and showed me (sorta) how to do it.  
The front.
The back.
I cross stitched a little Ariel onto some Irish linen with the idea of making a needle minder.  Ariel ended up being too large to fit on any of the cover buttons that JoAnn stocks, so I had to special order some huge cover buttons.  Shipping was more than my order amount.  :(  And it took FOREVER for them to ship to me.  I was a little worried that the swap ship date would come before the order, but luckily I got them with about a week to go.  I think this ended up being like the largest, most impractical needle minder EVER, but oh well, I worked really hard on it.  I printed off some Heather Ross tags and a card from her Prints book to use for packaging.

After completing this cross stitch, I have determined that middle age is really hitting me and I need to pull out my clip-on magnifying lens next time I try to do close up work.  Ha!  

I also included some pins that match the pin cushion, some Wonder Clips in coordinating colors, a mechanical pencil (love those things!), a Frixion marker, and a bag of Indiana-made gummies.


After watching a lot of swap reveals, here are some thoughts on swaps:  Please take the time to figure out what your partner likes.  They may not give you much to go on, or they may give very specific likes (that are probably totally different than yours), but at least look through their feed, try to find their Pinterest boards, and try to make something to their taste.  When you are filling out a swap sign-up form, if you really dislike something, say so.  Be honest about your skill level.  I admit I never know what to say, so I usually say intermediate because I'm definitely not a beginner, but don't know really what would constitute advanced--I'm not an expert at anything.  Even if a mosaic isn't required for the swap, do one anyway so your partner can see what you like. Check in when you're supposed to.  Ship on time.  You've been given a ton of time to make something.  No one wants to be left wondering if they will receive a package because the shipping deadline has passed and it's been weeks and they haven't yet received something.  Stay in contact with your host/swap mama.  Finally, please, please thank your person right away.  Nothing worse than seeing the package has been delivered and they don't acknowledge it for what seems like forever.  You're left hanging and it's not a great feeling, for sure.  Overall:  be considerate and treat others how you wish to be treated.  Good advice in life and good advice for swaps too.  :)